1785 Green Pierrot Jacket
Over the past few months I've always wanted to make a pierrot jacket...actually scratch that! I've always wanted to make a proper zone front. The past few attempts I've had to make a zone front, mostly resulted in me just sticking trim overtop of my gowns to mimic one. Seemed like a good idea at the time, and it was; but then overtime I came to realize "where's the challenge? You're not really making a zone front by decorating the front like that. Gotta actually get in there, and do it." To quote Miss Frizzle, "It's time to take chances, make mistakes, and get messy." So with that in mind, I pulled out some inspirations via Kyoto Fashion Book, Pinterest, 18th century fashion plates, and online tutorials and got to work.


 |
| Shameless plugging here, but my stockings and shoes are from American Duchess. I've had these shoes since 2013 and never once needed to get them replaced (especially with all the battle reenactment events and walking I have done in 5 years). |


I wanted to combine both the zone front style to the pierrot jacket. So looking at fashion plate illustrations was the first place to look for examples. If you look at the fashion plates, you can see how the jackets were designed with long sleeves and were cut out from around the stomach area and opened up to a fanned peplum in the back.


After studying these samples as well as the online tutorials from other costume blogs, I decided to try something I've never done before: I took my pattern of choice and made a mock up of 2 bodices - and of course cutting the stomach out of the second one to make the zone front. While cutting the patterns and sewing the pieces separately was easy, fashioning them together to make the zone front was the tricky part (mostly because I've never done this before and was doing trial by error). However, once things began to look more familiar to what I was going for, I was able to cut out the final layer of fabric using the Avocado green medium weight linen from Renaissance Fabrics, and the light medium weight white cotton fabric from Burnley & Trowbridge. I laid that over top of the 1st lining and 2nd muslin interlining, add the sleeves with cuffs, and add buttons to the top layer of the jacket (and to really experiment with this project, I made the green front actually open separately over top of the white like an actual jacket too!)

For the back, I omitted using the full length skirt like I would with any gown, and focused on the peplum. I added buttons to the bottom for decoration but also used them as measuring points to where I would be adding the peplum later on; plus, if I decide in the future to just add a full length skirt to it, I could polonaise it whenever I want. But for now, the short tail stays.


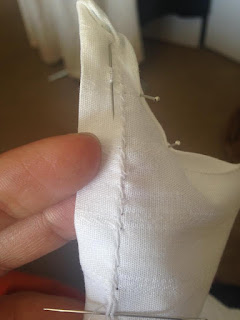
The peplum construction was pretty easy. I measured at least 1/2 a yard of fabric and folded it in half and then cut down the line, folded it again and started adding a large knife pleat to serve as the median. Then I added smaller knife pleats until it reached the button; I also made sure the other side was just as symmetrical. Then I did the same on the bottom and then did a thick 1/2 inch rolled hem to not only make it shorter, but also anchor it down and to give it sort of a Hawk's tail design.


I really had a lot of fun making this jacket, and learning how to construct one from scratch rather than adding trim to a gown or jacket and calling it a zone front. The only set backs I had to making this jacket was that I did not elongate the sleeves to my wrists and that i did not make the bodice a little longer around my sides to where I won't have to worry about my stays peeking through. Otherwise, I'm pretty happy with this piece and cannot wait to wear it this weekend.
.jpg)

Discover stylish layers that add elegance to any outfit! Our collection features fashionable designs, comfortable fits, and easy-to-style options. If you're looking for a versatile jacket with long sleeves, you'll find beautiful choices perfect for casual outings, travel, and everyday wear.
ReplyDeleteSimple and informative explanation.
ReplyDeleteYour post on the 1785 Green Pierrot Jacket beautifully highlights the elegance and craftsmanship of historical clothing. The detailed design reflects the fashion trends of its era while remaining inspiring today. outfit fashion continues to draw influence from vintage garments, proving that classic styles never lose their charm or relevance.
ReplyDelete