"La Petite Dauphine": 1770's Robe á la Française
In all my years of sewing dresses primarily from the 18th century, I've always wanted to make my own Robe à la Française, but many times have been intimidated by it's construction to be able to do it. I've looked at fashion plates, photos on Pinterest, and read countless blogs that some of my friends in the costuming and reenacting community have made of their own gowns, bought the pattern from American Duchess, looked through their dressmaking book for more detailed instructions (more on that later-trust me, you'll NEED the book), and lastly, stocked up on 9 yards of cotton fabric from a really good sale at JoAnn's' for me to experiment with (silk taffeta would not be the best option for a first time project). Keep in mind though, I started this project on September 19, 2019 in hopes I could get it ready for the Francaise Dinner in March 2020.
I was MORE than prepared... but still apprehensive to give it a try. So, all of the materials just sat in my sewing room for months.
But, here's where things get better. . . .
With the annual Francaise Dinner and Annual Garden Party in Colonial Williamsburg both being cancelled last year due to the Coronavirus, I am still determined to get this gown ready for when formal events are opened and hosted again safely; this year IS going to be the year that I step up to the plate and do it!

Photo courtesy of @eyesofaitch_photography (Instagram)

Gown
After cutting out all of the pieces from the AD pattern, I dressed my mannequin up in all of the underpinnings. I pinned both the back lining and front lining on first as they are the "groundwork" for the Française. Next was the part that gave me anxiety! As many times as I have pleated a petticoat or an apron, adding the back pleats to the gown would be a piece of cake. . .
 |
| Printed Saque from LACMA |
Well, after a few tries that is...
Once I managed to get the center pleats tacked down and adjusted the way that I wanted, I was pretty impressed. Most of my gowns and jackets have a fitted back to make things more uniformed to my silhouette; I've never done anything like this before. So, to see it actually turn out looking pretty decent for a first time project, I was feeling pretty proud of myself.


After securing the back pleats, I then focused the sides (pockets and side skirts). This was the trickier part, mostly because you had to pleat the side skirts down on top of one another (as you would with the back pleats) in order to form the pocket slits, and then attach the front part of the bodice. I had a little help from my friend Glynnis via FaceTime, who instructed me on how to work on that part of the gown's construction.

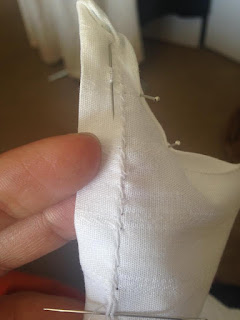
Once I tackled that challenge, it was down to attaching the lining to the gown... another obstacle I was suddenly faced with, because there was no real seamline for me to connect the lining to (as one would with an Anglaise). Again, I sought help from another online friend, Krista, who gave me some pointers and sewing secrets. After my many attempts to follow directions in replicating her instructions, I still did not get the results I wanted. Instead, I just sewed the front piece of the bodice to the side skirts and left the back piece of the lining open; I took in an extra 7'' or 8'' of the side seams to the Française fabric to make it more form fitting for my silhouette, and hemmed the entire gown so I wouldn't have to do it later.


Sleeves
I had WAY too much fun working on them because I was able to be a little creative with the adornments: making the ornate flounces, adding on all the pretty trim, and a lot of lace floof for the engagements! On a separate note, when buying lace to make engagements, be sure to get REAL lace. The polyester variation that I picked up at JoAnn's did not work well with what I envisioned because, not only was it not wide enough (for future reference, 20''-30'' in. wide is preferred), but it did not have the delicate feel that you'd expect from lace. Thankfully my friend Kelly had some lace fabric leftover from an apron I made her for the Garden Party. It was definitely a better selection, as it's fullness and length allowed it to cascade down the sleeves fluently.

Petticoat
The petticoat was of course the easiest task to complete. I used 4½ yards of poly silk taffeta but debated on whether or not to add the decorative flounce to the front as most Française petticoats have. I wanted to be able to use it with other gowns in the future, plus I wasn't sure if it would make the already decorated dress too busy. But after playing around with the trim and looking at several examples of petticoat decorations, I instantly fell in love and there was no turning back--I wanted this petticoat to look like a decorated birthday cake.


 |
Stomacher & Trim
The trim along the gown and stomacher consisted of gathers on either side of the fabrics; Both large and small pattern pieces needed to be cut to make this design. After doing so, I pinned the larger portion to make it in an S shape along the skirt of the Francaise. To hide the threads, I tacked down some fly fringe which really pulled the outfit together.


 |
My final fitting |
Overall, I would say that after 2 years of completion, this was definitely a labor of love and dedication. Since this was my very first francaise (and a mock up for my future silk variant) I definitely want to keep this post for future reference in case I want to make any improvements the next time around, such as how to make the bodice more form fitting around the sides. But other than that, I'm pretty pleased and cannot wait to wear my new gown to a ball in 2022(?)
.jpg)

Your francaise is absolutely breathtaking--the workmanship and color palette are so impressive. Bravo!!!
ReplyDeleteInformative Article
ReplyDelete